
Requirement:
- Laptop or Desktop running on Linux OS
- Working Tata photon whiz or Tata photon plus modem.
STEP 1:
First off all you need to install the PPP dialler on your computer. To do so, open the Terminal and type the following command:
On Linux Mint / Ubuntu:
sudo apt-get install wvdial
or(for root user)

On RedHat Linux: (for root user)
yum install wvdial
On Opensuse / Suse: (for root user)
zypper install wvdial
STEP 2:
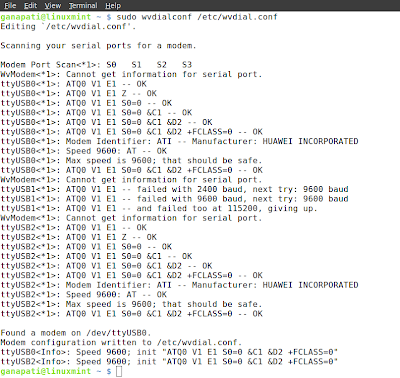
Connect the Modem to the Laptop/Desktop and ensure that the device is properly connected. Now open the Terminal and type the following command:
On Linux Mint / Ubuntu
sudo wvdialconf /etc/wvdial.conf
or(for root user)
wvdialconf /etc/wvdial.conf
On RedHat Linux / Opensuse / Suse (for root user)
wvdialconf /etc/wvdial.conf
STEP 3:
We need to edit the file /etc/wvdial.conf . We can use vi editor or any other text editor but as most of us are more comfortable with gedit we can type the following command:
On Linux Mint/Ubuntu
sudo gedit /etc/wvdial.conf
or(for root user)
gedit /etc/wvdial.conf
On RedHat Linux / Opensuse / Suse (for root user)
gedit /etc/wvdial.conf
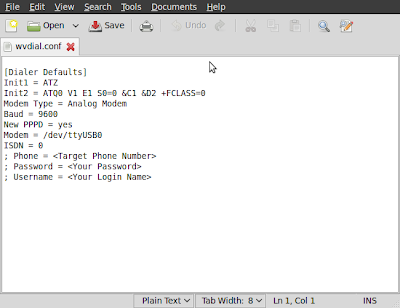
Make the following changes in the configuration file.
1. Delete the semi colon before last three lines phone, username, password
2. Enter phone no #777 username and password internet.
3. add this 2 extra lines in the configuration file at the last
Init3 = AT+CRM=1
Stupid Mode = 1
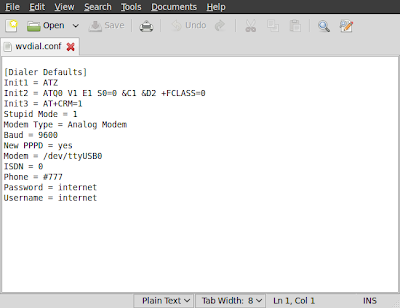
We are now done.
To connect to the internet , type the following command on the Terminal
On Linux Mint / Ubuntu
sudo wvdial
or(for root user)
wvdial

On RedHat Linux / Opensuse / Suse (for root user)
wvdial
Open your favourite browser and start browsing.
Press Ctrl + C to end the call.
Good job !!! keep it up...
ReplyDeleteAwesome! Works as a Charm on Linux Mint 12.
ReplyDeleteBTW is there any GUI App for Linux which can take care of this ?
Thank you friend. There is a way to configure using Gui and it is quite easy.. you can open newtork connections and follow the steps.. But TUI is more of linux way..
ReplyDeleteI did the same thing on linuxmint12.My system detects the modem but not getting connected.Error is "Activation failed".Can any1 help me wid this
ReplyDeletePlease contact your customer care and confirm the username and password.They have changed that after the posting of this blog. Once you get them, you need to change the /etc/wvdial.conf and try again.
DeleteDo online Tata Photon Whiz Data Card Recharge and enjoy whizzing around the internet. Stay on the go at anytime and anyplace.
ReplyDeleteATDT#777
ReplyDeleteNO CARRIER
ATZ
--> No Carrier! Trying again.
--> Sending: ATDT#777
--> Waiting for carrier.
ATDT#777
NO CARRIER
--> No Carrier! Trying again.
--> Sending: ATDT#777
--> Waiting for carrier.
ATDT#777
i'm getting same thing again and again
good, it worked
ReplyDelete